Twokinds ARCHIVE Forums

This forum is for the preservation of old threads from before the forum pruning.
It is currently Sat Aug 02, 2025 5:21 am

All times are UTC - 5 hours


Post new topic Reply to topic  [ 11 posts ] 

Did this tutorial help you?
Yes 57%  57%  [ 4 ]
No 42%  42%  [ 3 ]
Total votes : 7
Author Message
 Post subject: PSP tutorial
PostPosted: Sun Aug 07, 2005 4:13 pm 
Offline
traveler
User avatar

Joined: Sun Aug 07, 2005 2:29 pm
Posts: 22
Hello everyone, i may have just registered, but be aware that i have been watching these forums a while.
I was coloring with my Jasc Paint Shop Pro earlier and created this picture-
Image
(why does this remind me of Jill Valentine from Resident Evil?!?!)
I figured "This came out amazingly good! I should create a tutorial for this.

Thus, here it is. If you will follow my steps, you can learn to master this powerful and inexpensive program


Firstly, I would like to thank Kang who drew the picture in the first place. Never would have been possible without him =)
Tom for creating TwoKinds
And lastly, all of you for reading this!
Materials Needed:
A clean pen drawing.
Jasc Paintshop Pro (this tutorial is for PSP 8 )
A pack of Altoids (cinnamon is nice)
A computer monitor :roll:
When you have these materials, your ready to go!

------------------------------------------------------------

Image
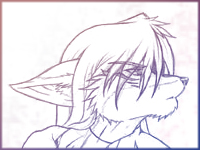
Step 1: Start out with a nice clean pen drawing. IT NEEDS TO BE CLEAN!!!! PRIORITY ALERT: NOT CLEAN = BAD FINISH!. In this case, i am using my roleplay character Taser Rander, drawn by the all powerful Kang Holion! :) Remember this: Kang R Pwn u badly =)
What you want to do is erase all the white using your Backround eraser. In this case, i am using the 500 pixel brush, with sharpness of 0, opacity 100, and no step- just to obliterate everything. If your going for little thin lines, get prepared to do some extra work. When your done cleaning the linework up, name this raster layer "Line art". Go into the layer properties and under blend mode press "Multiply" from the drop down. Now we can get coloring!


Make another raster layer and leave all the perty options alone and name it "coloring".
I wanted a black backround, so i did that part after i got the base colors in
Take your flood fill, and make the whole layer black. Place it under the lineart layer, and you should see a grey outline. Take your airbrush tool and on the black layer, color the base colors down. For this i used white for clothing, brown/red for the hair, gold for the belt buckle and brown for the gloves. Make a dot off to the side with each color for future reference. So far, you should have this:
Image
Starting to look nice, isnt it?
Make another raster layer, and name it "Shading".
Set the opacity to 33, and start shading in what must be shaded. keep light sources in mind the WHOLE time!!!
Now it should look like this:
Image

Create yourself a texture brush to resemble fur, and then set it to a small size, around 15. Open brush variance and set the Rotation to angle, and jitter to 2. leave the other stuff alone.using the airbrush, set the opacity to 2 and start using this to touch up shadows. also use this to create any patterns on the fur. Take two more shades of the color of the clothing, one darker and one lighter, and place it randomly. use very low, or no hardness and very low opacity. This makes the clothing look more like... clothing =). Woah! her hair looks flat. Pickup a color to use for the highlights and use a circular brush, size 5-10 and 0 hardness. I used orange for highlights. You also need shadows for the hair. I used brown. just scatter small lines going in the pattern of the hair
Your almost done!
Now it should look like thisImage
Well, you can say "im Done" right now, or go on and do this last step just to make it more proffesional. I recommend the latter =)
Go back to your beloved lineart layer, and go on the menu at the top to
/adjust/add-remove noise/ edge preserving smooth.
Now go to adjust/brightness and contrast/highlight-midtone-shadow
Set all the variables to -100 and all your lines will become solid and black!
for kicks, i went to adjust/softness/soft focus and applied the Dream filter to the Color layer.

Well, if you did this right, your finished product will look like this!!!
Image
This and the first one are different, but by doing this step by step method, they came out almost the same!

Thanks again Kang, and sorry your signiature didnt survive that last filter there =)

Thanks for reading this! Happy Coloring!


Top
 Profile  
 
 Post subject:
PostPosted: Sun Aug 07, 2005 6:48 pm 
Offline
He Who Makes Catgirls
User avatar

Joined: Fri Dec 17, 2004 6:02 pm
Posts: 2574
Location: Virginia
Better tutorials can be found here
http://2kinds.com/forum/viewtopic.php?t=728


There are a lot better ways to color a picture than your methods - also you may want to digitally rework your line art for a better quality contour or at least work out the inconcistancies in the lines- nice attempt though- i like it when people take steps to improve thier coloring and those who use digital methods as well as Traditional.


Top
 Profile  
 
 Post subject:
PostPosted: Sun Aug 07, 2005 6:54 pm 
Offline
Apprentice
User avatar

Joined: Fri Jul 15, 2005 11:19 pm
Posts: 129
hmm my my a different take then i would have taken, Though truely i blelive it is best to develop your own methods Sage. tutorials offer good advice though so i won't discourage reading it. though honestly i may want a peek myself as i never read a tutorial on digital coloring before now. very nice picture btw ^^ though i can't say as the skin/fur tones agree with me.


Top
 Profile  
 
 Post subject:
PostPosted: Sun Aug 07, 2005 7:10 pm 
Offline
He Who Makes Catgirls
User avatar

Joined: Fri Dec 17, 2004 6:02 pm
Posts: 2574
Location: Virginia
Xero1 wrote:
hmm my my a different take then i would have taken, Though truely i blelive it is best to develop your own methods Sage. tutorials offer good advice though so i won't discourage reading it. though honestly i may want a peek myself as i never read a tutorial on digital coloring before now. very nice picture btw ^^ though i can't say as the skin/fur tones agree with me.


I'm trying to say there are better ways to doing exactly what he did-- also its filled with errors-- you and always learn something by taking a look at how the pros do it ya know-- and there are many different tutorials on it-- i try to read them all -- this one seemed incomplete and lacks the refinement i would have expected from someone trying to teach it to others-- still a good attempt though


Top
 Profile  
 
 Post subject:
PostPosted: Sun Aug 07, 2005 8:08 pm 
Offline
Apprentice
User avatar

Joined: Fri Jul 15, 2005 11:19 pm
Posts: 129
heh i never try to teach anyone art anymore it feels like i'm assuming too much of myself. I don't want to feel like i'm placing myself above anyone. Especially considering how many people are so far above me.


Top
 Profile  
 
 Post subject:
PostPosted: Sun Aug 07, 2005 8:12 pm 
Offline
traveler
User avatar

Joined: Sun Aug 07, 2005 2:29 pm
Posts: 22
I figured out that you can just go to layer properties and click multply :roll: there we go, no more Backround Eraser. that eliminates what, 20 minutes of useless work? :D
ps: its a she -_- im not a he!


Top
 Profile  
 
 Post subject:
PostPosted: Sun Aug 07, 2005 10:58 pm 
Offline
Grand Templar
User avatar

Joined: Fri Feb 18, 2005 10:33 pm
Posts: 1559
Location: Hurricane Central
Hehe...I think people generally assume male unless otherwise stated ^.^;;


Top
 Profile  
 
 Post subject:
PostPosted: Sun Aug 07, 2005 11:38 pm 
Offline
He Who Makes Catgirls
User avatar

Joined: Fri Dec 17, 2004 6:02 pm
Posts: 2574
Location: Virginia
Taser wrote:
I figured out that you can just go to layer properties and click multply :roll: there we go, no more Backround Eraser. that eliminates what, 20 minutes of useless work? :D
ps: its a she -_- im not a he!

Yeah you need a cute avatar or something so we can know-- anyways sorry madam! ^_^
btw you shouls fix your signature-- you have one to many [/img] tags ^_^


Top
 Profile  
 
 Post subject:
PostPosted: Mon Aug 08, 2005 11:52 am 
Offline
traveler
User avatar

Joined: Sun Aug 07, 2005 2:29 pm
Posts: 22
Image
Using a slightly different technique, i came up with that one.


Top
 Profile  
 
 Post subject:
PostPosted: Mon Aug 08, 2005 11:59 am 
Offline
Grand Templar
User avatar

Joined: Fri Jul 22, 2005 3:33 am
Posts: 1608
Location: your worst nightmares
cool!


Top
 Profile  
 
 Post subject:
PostPosted: Mon Aug 08, 2005 2:12 pm 
Offline
Grand Templar
User avatar

Joined: Fri Feb 18, 2005 10:33 pm
Posts: 1559
Location: Hurricane Central
LOL at your avatar Taser


Top
 Profile  
 
Display posts from previous:  Sort by  
Post new topic Reply to topic  [ 11 posts ] 

All times are UTC - 5 hours


Who is online

Users browsing this forum: No registered users and 17 guests


You cannot post new topics in this forum
You cannot reply to topics in this forum
You cannot edit your posts in this forum
You cannot delete your posts in this forum

Search for:
Jump to:  
Powered by phpBB © 2000, 2002, 2005, 2007 phpBB Group